|
The
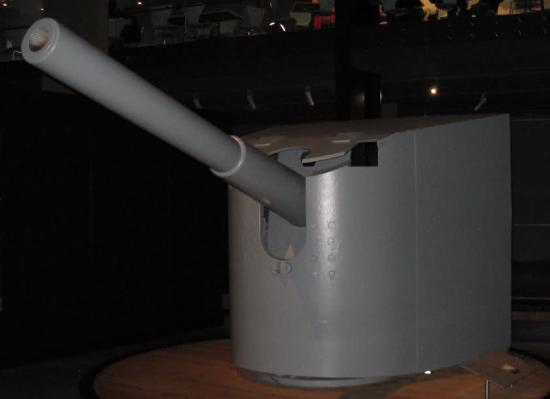
10.5cm SK L/40 Naval Gun
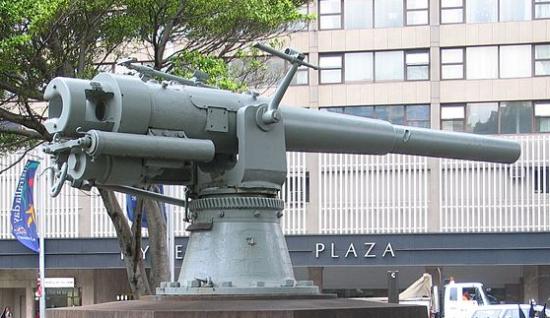
10.5cm SK L/40 from
the SMS Emden on display in Hyde Park, Sydney,
Australia
Photo by
Bukvoed on
Wikimedia
The naval arms race
between Britain and Germany in the late 19th and
early 20th centuries as pursued by the German emperor, Kaiser Wilhelm II and put into practice
by Admiral
Alfred von Tirpitz
demanded the very best in naval firepower of the
day. In the case of cruisers such as the SMS Königsberg
and SMS Emden, this was the 10.5cm SK L/40.
Specifics of the
10.5cm SK L/40
The main
armament of the SMS Königsberg came in the form of ten
quick firing heavy guns,
the Krupp 1905 model
10.5cm Schnellladekanone Länge 40 or SK L/40 for
short. Schnellladekanone means quick loading cannon
and referred not only to the speed which the
horizontal sliding breech could be loaded by also by
implication how fast it could be fired- up to
fifteen rounds per minute with a well trained crew. Länge 40
refers to the length of the barrel in multiples of
the calibre. The calibre
of the gun was 10.5cm or roughly 4.1" (as the
gun was
often referred to in British texts measuring in
inches).
The SK L/40
guns themselves weighed a massive 1,555kg, were
4.475 metres long and fired a 17.4kg high explosive
shell with a muzzle velocity of 690 metres per
second up to a maximum range of 12,200 metres (or
almost eight miles). This out ranged the guns of the
HMS Pegasus or for that matter any British
naval gun off the East African coast, any Belgian
gun on the Lake Tanganyika coast and for a while any
land gun the allies had to oppose the Germans with.
The SMS Königsberg
had ten of these guns, each of the guns were mounted on
a fixed pivot stand, bolted to the deck of the ship.
The type of stand used on the Königsberg was the naval Mittel-Pivot-Lafette
C04.,
The stand
was bolted to the deck of the ship and did not move.
On top of the stand was the gun bucket which could
rotate traversely. The gun bucket held the gun
cradle via two trunion posts. The cradle could then
pivot up and down within the gun bucket. On top of
the cradle was a maintenance panel hatch to access
the barrel. The barrel itself was held inside the
cradle and could slide back within it to take the
shock of firing.
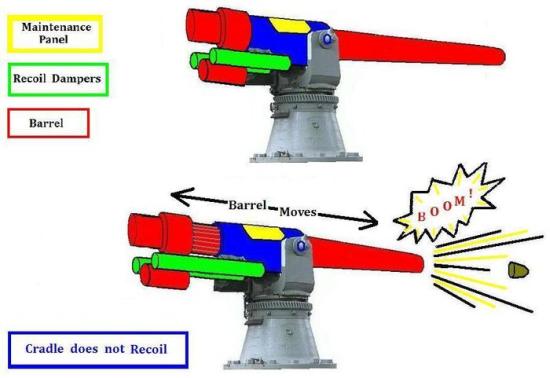
Diagram of the Guns
Mounting Parts and Recoil Mechanism of the 10.5cm SK
L/40
Diagram by
Bob Wagner
Similar
10.5cm guns had been used on German naval ships
since around 1900. The 1905 modification
was to add a more effective recoil system in the
from of two damper cylinders below the barrel.
Whereas older naval guns rolled back on wheels or
rails when they fired, the barrel of the SK L/40
recoiled back in its cradle, while the dampers took
the force and returned the gun into position for its
next round. This system saved time in re-aiming the
gun and of course meant that it was ready for its
next round almost immediately.
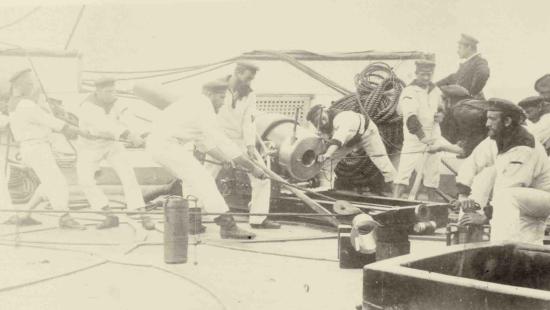
Gun
Crew of the SMS Hertha, c1874-77
The crew are manually hauling a pre-recoil gun on rails
back into position after firing.
Photo by Gustav Adolf Riemer by
©
Frankfurt University Koloniales Bildarchiv
The 10.5cm SK
L/40 guns with the 1905 recoil
dampers below were standard on many German
cruisers from that date including the SMS Emden
(which raided allied shipping in the Indian Ocean
and bombarded Madras in British India during the
First World War), the
SMS Breslau (which along with the SMS Goeben caused
the Turkish Ottoman Empire to join the First World
War by bombarding the Russian Black Sea port of
Sevastopol while under the Turkish flag) and of course the sister ships of the
SMS Königsberg, the
SMS Stettin,
SMS Stuttgart
and SMS Nürnberg (which sank with heavy loss of life
at the Battle of the Falklands in 1914).
The gun in a slightly redesigned form as the
longer 10.5cm SK40 L/45 was still
in use on submarines and as naval anti-aircraft
weapons in the Second World War.
Aside from
the remaining guns from the SMS Königsberg which are
our specific topic of interest, two other 10.5cm
SK L/40 guns are still in existence from the SMS
Emden and are on display in Australia, one at the Australian War Memorial Museum in
Canberra and the other
at Hyde
Park, Sydney. These guns are identical 1905 models
to those used on the SMS Königsberg.
Gun Crew
The gun crew would usually consist of five: A gun
commander, to relay the orders for firing and
oversee the gun crew, a gun layer who stood to the
left to aim the gun, a gunner
on the right to open a close the breech and also to
fire the gun and two loaders. One loader
took the shells from their cordite cases and passed
them to the other who inserted them into the breech
as the right side gunner opened it.
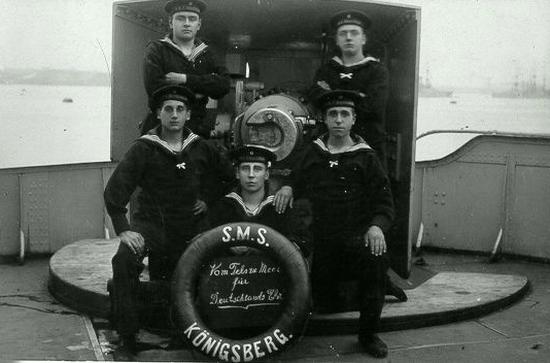
10.5cm Königsberg
Midship Turreted Gun and Crew, pre-war
Operation and
Aiming of the Gun onboard Ship
When the ship's officers on the
bridge spotted a target, the target's coordinates or
'firing data' (degrees of elevation and traverse)
were relayed to the gun crews. Elevation was based
on the range of the target. Traverse was based on
the direction of the target dependant on the bearing
of the ship in relation to magnetic north.
Adjustments were made to compensate for wind speed
and for
the speed of both the ship and its target and their relative
directions from each other. The range of the guns
was about 7.5 miles, so targets would usually be within
eyesight of the officers and their gun crews up on
deck on a clear day.
The gunners
then set the gun to aim at the given coordinates.
The gunner on the left set the set the traverse
with a brass wheel attached to a toothed
gearing system which pivoted the gun bucket around on its stand.
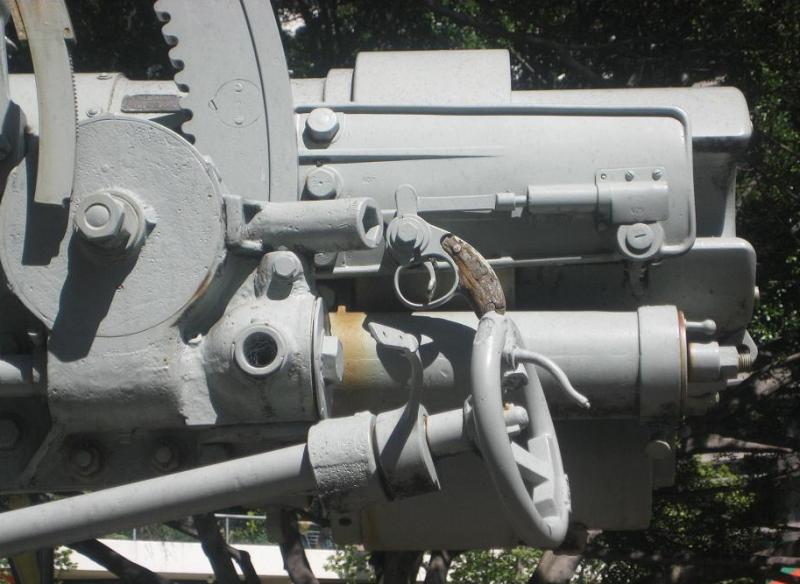
10.5cm SMS Emden Gun
in Sydney, 2012
Note the traverse mechanism being a wheel handle on
the right of the photo turning an axle which drives
a gearing system on the teeth of the pivot stand.
Photo by Saberwyn at
WikiCommons, Hyde Park Sydney 2012
Range via elevation
was also set by means of
a brass wheel on the left attached to a toothed
gearing system which raised (by up to 20 degrees) or
lowered (by up to 10 degrees) the barrel within the
gun bucket. The degrees of traverse and elevation were marked on
the pivot stand and elevation mechanism so a spotter could call degrees of
aimed fire and the gun crew could modify their aim
accordingly without themselves needing to see the
target.
At the same
time, the gun layer sighted the target if possible using the aiming
sight on the left and made further adjustments to
the traverse, the handle for which he could operate
from the left sighting position. A second sight on
the right of the barrel could be used to call
further adjustments to the elevation. Both sights could
be adjusted horizontally to allow for the elevation
of the barrel.
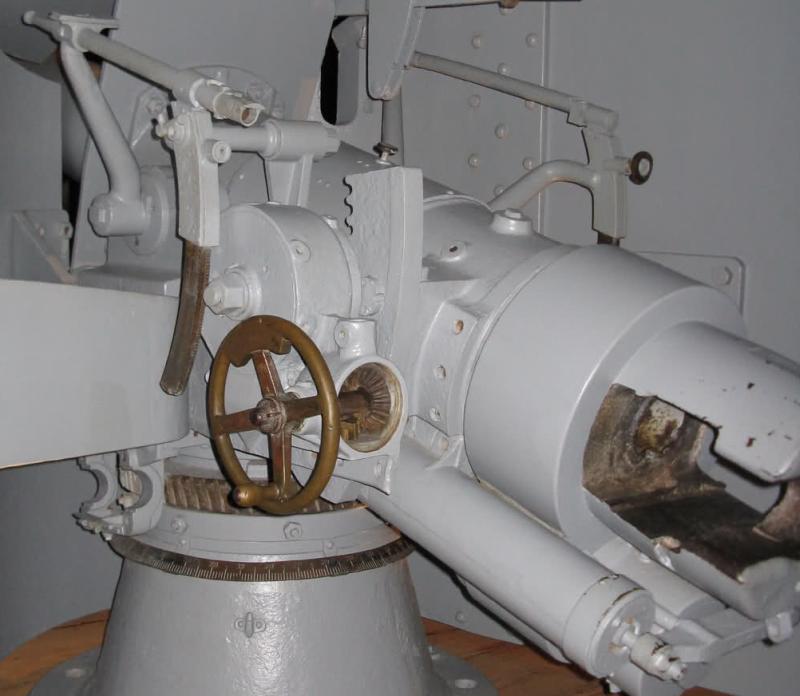
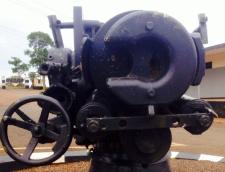
Breech of a
10.5cm SK L/40
from the
SMS Emden
Australian War Memorial Museum
The two aiming sights can be seen here
and the brass wheel to adjust the elevation
via the toothed gearing system above it. Note also
the degrees of
traverse measured on the pivot stand and the recoil
damper cylinder below the barrel. Several parts are missing from this gun,
notably the breech block, traverse mechanism and pistol grip.
Photo by Andrew from
Melbourne on the
Ship Model Forum taken at the Australian War
Memorial Museum, Canberra
Firing the Gun
The gun was
fired either by a gunner to the right pulling a
lanyard attached to the firing mechanism on the
breech or by the gun layer on the left using a pistol
grip.
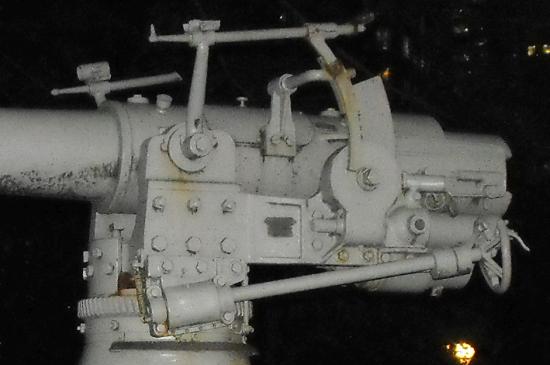
Breech of another
10.5cm SK L/40
from the
SMS Emden
This gun had different parts of the left side aiming
and firing apparatus intact and missing. On this
example the elevation wheel is missing but the
traverse wheel and trigger grip are intact.
Photo at
Hyde Park Sydney 2012
As the gun fired the barrel recoiled back
inside the cradle which remained fixed. The shock of
the recoil was taken by the 1905 two damper cylinders below
the barrel on either side. These returned the gun to
position for firing the next round.
Re-Loading the Gun
After firing,
the gunner to the right, pulled the breech lever
backwards and down to open the horizontal sliding breech, which
also ejected the spent shell casing. A loader
pushed a new shell into the breech and the right
side gunner pulled the breech lever up to close the
breech ready for firing a again. In trails, fifteen
rounds per minute could be fired this way,
Opening and
Closing the Breech Block

Breech open for loading with the
handle rotated back and the sliding
breech block slid out on the right |

Breech closed for firing with the
handle pushed forward and the sliding
breech block slid inside the breech |
| |
|

10.5cm
Gun Crew on
Board the SS Goetzen
on
Lake Tanganyika
This posed photograph shows very well the
actions of the crew. The gun layer is looking
through the left aiming sight. the gunner to the
left adjusts the traverse wheel out of sight behind
the breech. The right side gunner controls the
sliding breech block. One loader is pulling a shell
from its case while the other prepares to load a
shell into the breech.
Photo from
WikiCommons
Turrets
10.5cm SK L/40
from the
SMS Emden on display in its Turret
Photo by Andrew from
Melbourne on the
Ship Model Forum taken at the Australian War
Memorial Museum, Canberra
Six of the guns on the
SMS Königsberg were mounted in open backed armoured
steel turrets that were bolted to plates which
in turn were bolted to the gun cradle and revolved with them.
The turrets had a hole on either side for the aiming
sights, the main one on the left (from the firers'
point of view) being larger than the vertical slit
on the right for elevation.
The guns that were
turreted
had a steel flange on the barrel cradle onto which
was bolted a heavy steel shield which fitted into
the firing slot in the gun's turret, protecting the
gunners inside. Even when the guns fought later on
land or were on display as allied trophies with
their turrets long since discarded,
the guns that had originally been installed in
turret mountings on the SMS Königsberg can told
from those that were in cupolas without turrets by
the presence or absence of these flanges on the
barrel cradle.
This was a turning point in
our identification of different guns from each other
and was spotted by Bob Wagner. Using this method we
were able to see from period and more recent
photographs that the guns captured at Kahe,
Bagamoyo, Korogwe, Tabora and Masasi were from
turreted guns, while those captured at Mwanza, the
Ruvu River and Kibata were from the ship's side
cupolas. (The guns put out of action at Kondoa-Irangi
and Mahiwa had not at this stage been identified in
photographic records.)
The buckets of the
turreted guns can also be identified by bolt holes
to hold the turret supporting plate. Gun buckets of
guns with no turret have no bolt holes.
The turreted guns were
the two on the fore deck, the two amidships and the
two on the aft deck (marked on the diagram below in red). The four guns marked in blue on
the sides fore and aft were not given turrets but
had an unarmoured, detachable cupola around them.
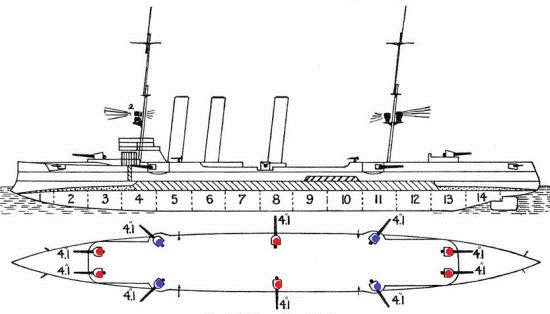
Diagram of the Gun Configuration on the SMS
Königsberg
Illustration published by Jane's 1914
from Wikimedia
The
armoured turrets were retained by these six guns in
1915 after their salvage from the wreck of the
Königsberg in their new static positions. Two of
the turreted guns were in Dar
Es Salaam, two were in Tanga, one was at the at the Elephant's Foot
in Kigoma and the other was on board the SS Goetzen
on lake Tanganyika. The turrets were discarded in
1916 when the guns were mounted on carriages for
mobile warfare.
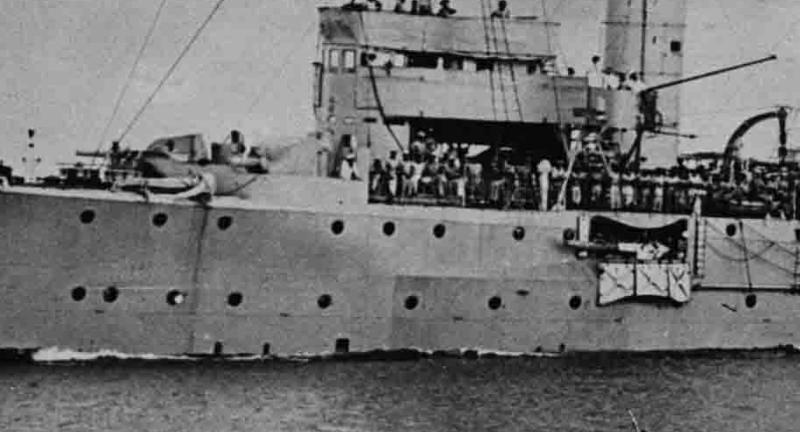
Closerlook at the Port
Side of the SMS Königsberg
Note the two forward deck
gun turrets and the fore port side cupola gun. In this image the
cupola is opened to see the unturreted gun on its pivot
stand. Incidentally, it was these port
side guns that first opened fire on the SMS Pegasus
at Zanzibar on 20 September 1914.
Photo
by Walther Dobbertin from the Bundesarchiv on
Wikimedia
Sources and
Links
Reminiscences of East Africa' by Paul von
Lettow-Vorbeck, Naval &
Military Press Ltd 2004
'Königsberg- A German East African
Raider' by Kevin Patience, Zanzibar Publications,
Bahrain 1997
"Das Offizierskorps der Schutztruppe für Deutsch-Ostafrika
im Weltkrieg 1914-1918" by
Wolfgang-Eisenhardt Maillard and Jürgen Schröder,
Walsrode 2003
"The First
World War in Africa" by Hew Strachan, Oxford
University Press 2004
Original Map from 'A
Short History of the Great War'
by AF Pollard,
Methuen & Co, London
1920
'A Machine Gunner’s Odyssey Trough German East
Africa: January 1916- February 1917'
by
ES Thompson, South African Military History Journal
Australian War Memorial Museum in Canberra
Photos by Andrew from Melbourne on the
Ship Model Forum
NavWeaps
Lovett
Artillery
Axis History Forum Discussion on the SMS Königsberg
Guns in English
Panzer Archiv Forum Discussion on the SMS Königsberg
Guns in German
|